

Better Homes And Gardens Flash Cook Turkey
As a woman of tradition, turkey is always the star of my Thanksgiving menu. With its immense size, caramel-colored crispy skin and savory aroma, turkey is not only delicious, but a show-stopper and a family favorite.
As a family, we have always eaten our Thanksgiving meal at around 2:00 p.m. I don't know why – it's just tradition. But to cook a 20+ pound turkey and have it ready to eat at 2:00 p.m. was always challenging. My mother used to get up every Thanksgiving at the crack of dawn in order to have the turkey out of the oven by 1:30 p.m., so that it could rest and be carved in time for the 2:00 p.m. sit-down (NOTE: average roasting time for turkey is 20 minutes per pound, so a 20-pound turkey takes about 6 1/2 hours, plus "resting" time of 20 to 30 minutes before carving).
And then she discovered Foil-wrapped Roast Turkey!
More years ago than I can remember (my mother is 82), she found the recipe in her much-loved Better Homes and Gardens New Cookbook (see "Casa Bella Swedish Pancake Factory" for more details) and decided to try it. And, since that first trial run, she never cooked turkey any other way, because this method cuts the roasting time to about half. So, that's how I learned to make turkey.
The kicker, however, is that her method from her cookbook did not produce much in the way of "pan drippings" to make gravy. While we always seemed to have enough gravy for our family of six, making Foil-wrapped Roast Turkey and having enough gravy for 20+ people (the average number that graces our Thanksgiving table since the four of us married and started having children and now grand-children) was problematic!
Fast forward into the future, but still more years than I can remember, I decided to try wrapping the turkey in a foil pan instead of wrapping the turkey in a tight foil package. And, guess what? It worked! In addition, it produces so much in the way of juicy drippings that we have gravy in abundance!
So, if you are pushed for time on Thanksgiving or just want to be able to create more gravy without buying canned gravy, a package mix or making additional gravy using chicken broth/stock, give this recipe a try. Another added benefit is that there is no messy roasting pan to clean up afterwards.
In all the years I have made turkey this way, I've only had it fail twice:
Once, I set the oven at 325 degrees (have no clue why; just a "pre-senior" moment!) and didn't notice what I had done until it was time to take the turkey out of the oven and found it, basically, raw! 3+ hours later and many starving guests (didn't have a "backup plan", thus no snacks, appetizers, etc. except crackers and cheese), we sat down to turkey dinner (and I mean "dinner" because it was night-time instead of our traditional afternoon sit-down!).
The second time, I dropped the turkey when I took it out of the oven (so it hadn't really failed; I failed!). Actually, I threw the turkey across the room (I give you permission to laugh)! It was really heavy (probably at least 25 pounds) and I lifted it by myself. I was at my aunt's house and her oven wasn't near a convenient counter-top (NOTE: I highly recommend that a clear, unobstructed counter-top be nearby when removing turkey from the oven). So, I had to carry it a short distance to a counter-top.
Now, imagine this in slow motion {it's okay to laugh; it IS funny!}:
While walking across the kitchen, I "sloshed" the pan and turkey drippings splashed out on the floor in front of me. I stepped in the turkey drippings puddle and slipped, crashing to the ground and sending the turkey flying across the room! Hot turkey drippings splashed all over me, ruining my clothes FOREVER (had to throw them away because no amount of washing and dry-cleaning was getting that greasy turkey pan drippings smell out of my outfit! And, it was a really nice, much-loved skirt, blouse and beautifully embroidered vest), and creating a nice bruise on my bum!
The turkey broke apart in pieces, but since, again, we had no "backup plan", we practiced "the 3-minute rule" (or is that the "3-second rule" when things fall on the floor?) and salvaged what we could from the turkey and ate it anyway!
Happy Thanksgiving!
Here's what you do (I mean to prepare and roast the turkey; NOT throw it across the floor!):
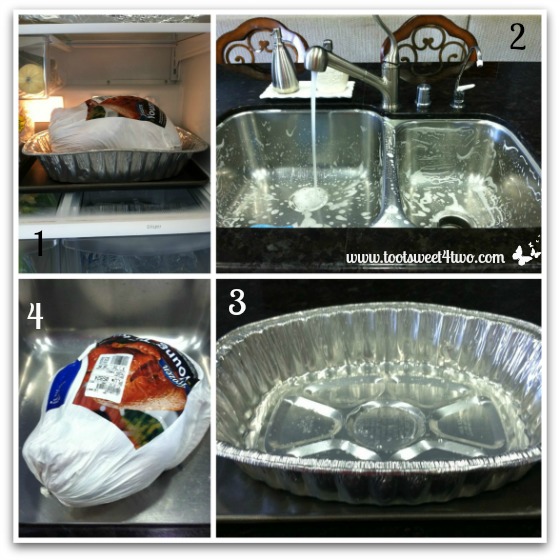
- If you purchased your turkey frozen, defrost in the refrigerator. It takes one day to defrost for every four pounds of turkey, so a 20-pound turkey will take five days to defrost in the refrigerator (so plan ahead!). I place my frozen turkey in an aluminum roasting pan on top of a large baking sheet. That way the defrosting turkey won't make a mess in my refrigerator!
- Clean your sink with soap and hot water.
- Prepare your roasting pan. I use a large oval foil pan supported by a very large baking sheet. I also defrosted the turkey in this pan so once I placed the turkey in the clean sink, I washed this foil pan.
- Put the defrosted turkey in the clean sink (or use a clean plastic tub big enough to manipulate it). This turkey is 20.06 pounds.
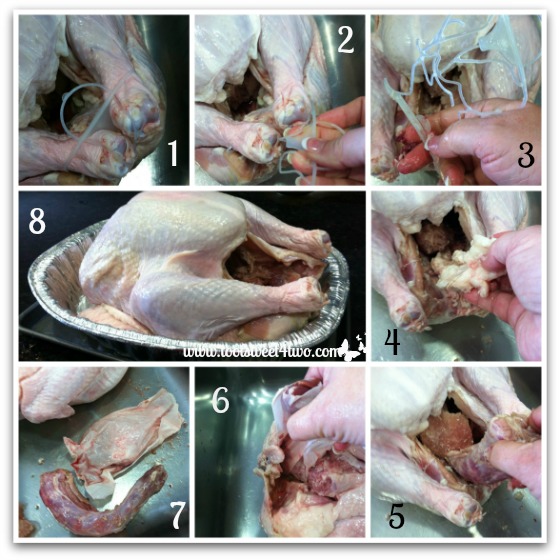
- Locate the plastic "ties" that surround and encase the turkey legs. This turkey will roast at 450 degrees for 3+ hours and I don't know about you, but I don't want roasted plastic in my Roasted Turkey!
- Snip the plastic on the turkey legs and twist to remove.
- Remove ALL the plastic from the turkey. This plastic is "injected" into the turkey and it's quite difficult to remove (but possible). Keep tugging and twisting until mission accomplished! I don't know whose bright idea it was to put plastic inside a turkey, but I'm sure that it's not a good thing! Probably carcinogenic, wouldn't your agree?
- Remove any big pieces of fat from the turkey.
- Remove the turkey neck, which is usually located inside the turkey's cavity.
- Remove the bag of giblets from the turkey. These are also usually located inside the turkey's cavity, but often times at the opposite end.
- If you like giblet gravy, remove the heart, gizzards, and livers from the paper bag (notice they put this stuff in a "paper" bag but they use plastic ties made of steel on the legs! Go figure!) and place them along with the turkey neck into a pot with water, simmer for an hour and then remove from heat and allow to cool. Then, chop up the pieces to add to your gravy.
- Rinse your turkey thoroughly, drain, pat dry and place in roasting pan breast side up.
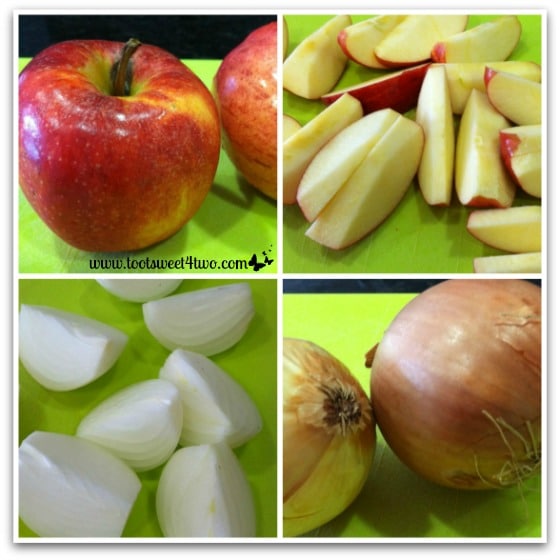
Next, prepare your apples – slice in half, core them and cut into wedges. Peel the onions and cut into wedges. I don't put stuffing in my turkey and I don't recommend that you do. Stuff the cavity with apples and onions to prevent the turkey from collapsing.
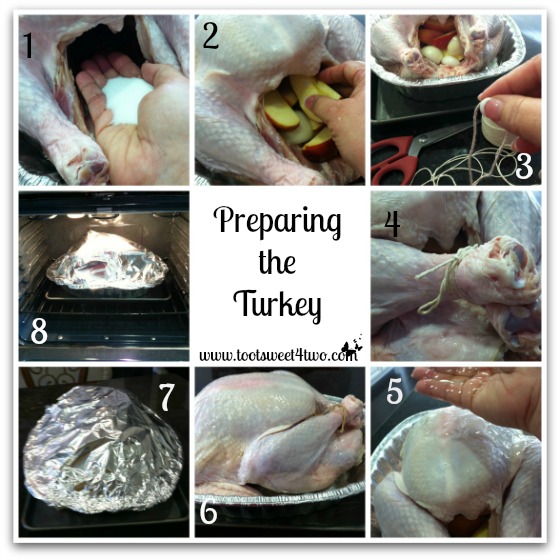
- Salt the turkey cavity.
- Stuff the turkey cavity (both ends) with apple slices and onion wedges.
- Tie the turkey legs with kitchen twine. Sorry I'm not showing the actual demonstration of tying the legs, but you try to tie turkey legs with twine while you're taking a picture with the other hand!!!
- Turkey legs tied with kitchen twine.
- Coat the turkey with a handful of canola oil, rubbing the outside making sure to include the legs and wings.
- Turkey ready for the oven.
- Cover turkey and foil pan completely in heavy-duty aluminum foil, sealing tightly.
- Remove all but one rack from the oven and position the remaining oven rack on the bottom rung. Place foil-wrapped turkey in preheated 450 degree oven and roast per cooking chart. DO NOT open oven during this time or oven temperature will drop increasing needed roasting time.

- When 20 minutes remain on cooking time, carefully remove foil from turkey. I use tongs to perform this task. Carefully lift the foil at one end, allowing steam to escape. Then, using tongs, remove foil completely.
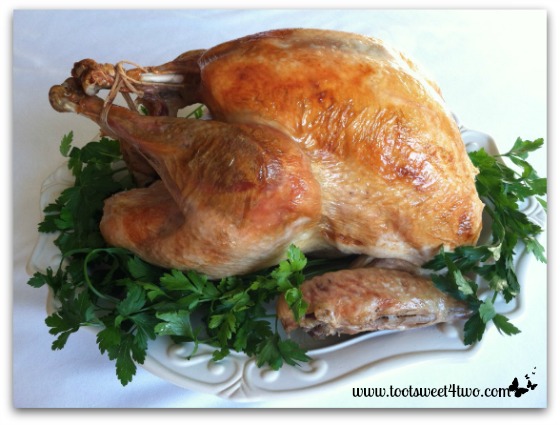
- Turkey will be pale. See all the turkey juices in the pan? If you want to use a turkey thermometer, now is the time to insert it. Return turkey to oven and continue roasting until nicely browned.
- Roast turkey, uncovered, for another 10 to 20 minutes until nicely browned.
- Carefully remove turkey pan from oven. Pan will be full of juices and will be heavy. If necessary, have two people remove it by lifting each end of baking sheet, using pot holders or oven mittens. Using turkey lifters inserted at each end of turkey, carefully lift turkey from foil pan and place on cutting board. Reserve turkey pan juices to make gravy (see Turkey Gravy post).
- Cover turkey loosely with foil and allow to rest for about 20 minutes.
- Charlie carving the turkey.
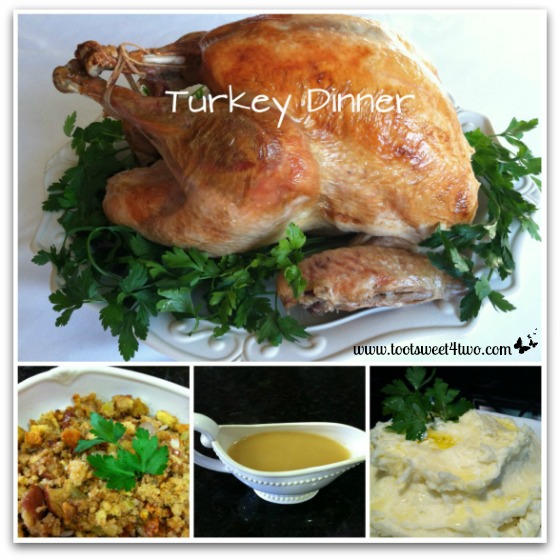
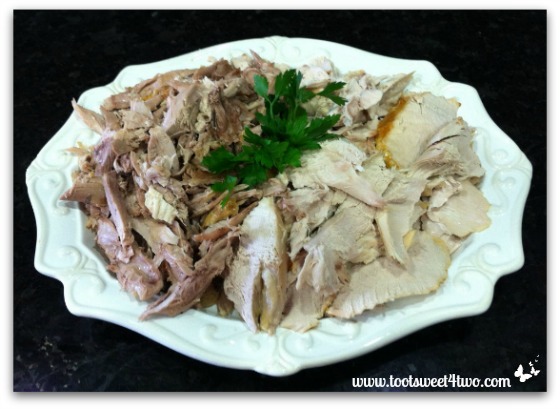 Carved turkey on a platter – YUM!
 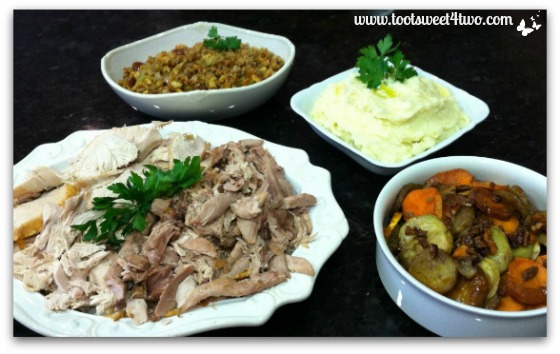 Turkey dinner ready to serve!
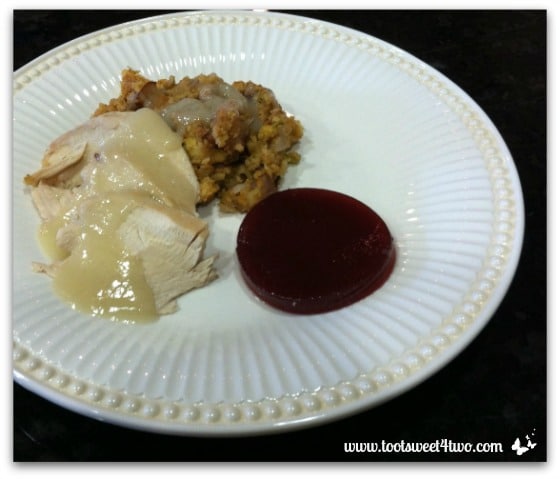
Here's the recipe:
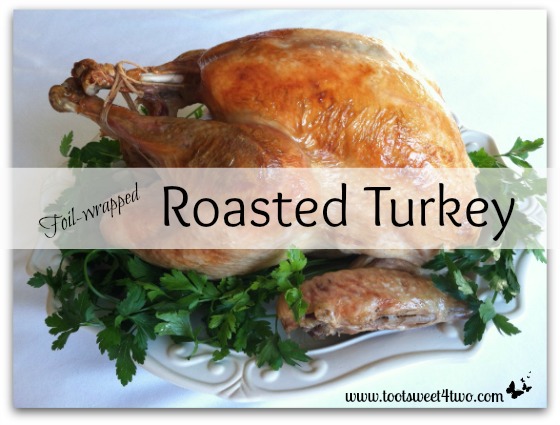
Foil-wrapped Roasted Turkey
Foil-wrapped turkey – moist and delicious plus lessens the cooking time by almost half!
- Prep Time: 20 mins
- Cook Time: 4 hours
- Total Time: 4 hours 20 mins
- Yield: 20 1x
- Category: Main Dish
- Cuisine: American
Scale
Ingredients
- 1 whole turkey (8 to 24 pounds depending on your needs); this recipe is based on a 20-pound turkey
- 1 large foil pan
- 1 large baking sheet, large enough to hold the foil pan
- 2 large apples, cored and cut into about 6 wedges, each
- 2 large onions, peeled and cut into about 6 wedges, each
- 2 tablespoons salt
- 1/4 cup canola oil
- Several sheets of heavy-duty aluminum foil to cover turkey
- Defrost turkey in the refrigerator according to manufacturer's instructions (this could take up to several days: 1 day for every 4 pounds of weight).
- Preheat oven to 450 degrees and remove all oven racks except one; place remaining rack on bottom rung of oven.
- Peel and slice onions into wedges and core apples and slice into wedges and set aside.
- Place foil roasting pan on large heavy-duty baking sheet for support and set aside.
- Place defrosted turkey in clean kitchen sink.
- Remove bag and outer coverings from turkey.
- Remove plastic ring that encases turkey legs.
- Remove turkey neck and giblets from turkey cavities; if making giblet gravy, place in pot, cover with water and simmer for about an hour, then set aside to cool and cut up.
- Rinse turkey thoroughly with water, drain and pat dry.
- Place turkey, breast side up, in foil roasting pan.
- Twist turkey wings under turkey.
- Liberally salt inside of turkey cavity.
- Stuff both turkey cavities with apples and onions (this is to prevent the turkey cavity from collapsing).
- Tie turkey legs together with kitchen twine.
- Slather turkey with canola oil, covering legs and wings, too.
- Cover turkey and foil pan with several layers of heavy-duty aluminum foil, sealing tightly.
- Place turkey in preheated oven and roast according to the following roasting schedule based on turkey weight:
- Eight to 10 pound turkey = roast for 2 1/4 to 2 1/2 hours
- Ten to 12 pound turkey = roast for 2 3/4 to 3 hours
- Fourteen to 16 pound turkey = roast for 3 to 3 1/4 hours
- Eighteen to 20 pound turkey = roast for 3 1/4 to 3 1/2 hours
- Twenty-two to 24 pound turkey = roast for 3 1/2 to 3 3/4 hours
- When turkey is within 20 minutes of total cooking time, open oven and carefully remove aluminum foil from the bird (I use tongs to prevent steam burns).
- If using a meat thermometer, insert it in the center of the inside thigh muscle connecting to the cavity; it should read 190 degrees.
- Return turkey to oven and continue roasting 10 to 20 minutes until turkey is a nice golden brown.
- Remove turkey from the oven carefully; it's best to use 2 people because if it is a large turkey, it's quite heavy because of the addition of the pan drippings (pan will be quite full of pan drippings).
- Using large turkey lifters (large forks) inserted in each end of turkey, lift from aluminum pan and place on large cutting board to rest (reserve pan drippings for gravy).
- Cover loosely with aluminum foil and allow to rest for approximately 20 minutes.
- Carve and serve.
Notes
Don't open the oven and "peek" at the roasting turkey. It is important to keep the oven's temperature at this consistent high temperature to insure thorough cooking.
Recipe Card powered by
3.1.09
P.S. To My Girlfriends Kathy and Mory: I made the turkey in this post this past Saturday (November 17th), so all the pictures in this post are current. I was going to post pictures from a turkey I made on Memorial Day (long story; see Party by Amy), but changed my mind (that is a woman's prerogative) and cooked a new turkey! I thought you'd like to know!
Tootles,

Related Recipes
(other turkey and Thanksgiving recipes)
Clean Your Messy House Like a Total Boss

Ever wondered what's the best and fastest way to clean a messy house?
These simple, yet actionable tips will refine your routine leaving more time for you!
Sign up today and download your FREE checklist - How to Clean a Messy House Fast Like a Total Boss.
Success! Now check your email to confirm your subscription. Be sure to click the confirmation link to receive your freebie!
Better Homes And Gardens Flash Cook Turkey
Source: https://tootsweet4two.com/roasted-turkey/
Posted by: romannottly.blogspot.com
0 Response to "Better Homes And Gardens Flash Cook Turkey"
Post a Comment